Frequently Asked Questions
1. Acrylic Resin
1.1 Making a body casting with Acrylic Resin tips and tricks
Actually, the difference between working with plaster or acrylic resin is not that big.
The two biggest differences are:
1)mixing the products. Plaster can be mixed fairly quickly into a smooth “mush” while acrylic resin needs to be mixed more intensively to get a smooth mixture.
2) Acrylic resin does not absorb moisture as easily. That is why it is smart to make the alginate mold with 3 parts water instead of 4 parts. With 4 parts water on alginate, water droplets will come out of the alginate more quickly and will be visible in the acrylic.
Once mixed there should be no difference between casting with plaster or casting with Acrylic. That said I will now try to explain a bit more.
The small air bubbles , which you mainly see in the hands, come from the Acrylic resin itself and not from the mold. These air bubbles are in the resin during pouring and rise after the resin is poured into the mold.
Some of these bubbles make it to the pour opening and burst while others rise and remain trapped against the inside of the mold. These cannot escape and harden there.
The solution to this is as follows; Mix the acrylic resin on the highest setting with a drill mixer or mixer. Continue until there are no more lumps and a homogeneous mass has been created.
Now grab the mixing bowl with both hands and turn it with a jerky movement alternately left and right and keep repeating this. This movement releases air bubbles from the side.
Then you take the mixing bowl and tap the bottom on the table (you do this firmly too) keep doing this for at least a minute. Finally you put the mixing bowl back down and repeat the left right turning for a minute.
The mixture is now optimally prepared for bubble-free pouring. When pouring, make sure that you let the resin flow into the mold calmly. For the best result, hold the mold at a slight angle and let the acrylic resin flow calmly into the mold via the wall.
Once the mold is filled, grab the cup and repeat the mixing steps (i.e. turn, tap and turn again).
The missing fingertips, the missing fingertips are due to the entrapment of air during the pouring of the mold. These are not the result of using acrylic resin instead of plaster.
The solution to this problem is to tilt the mold while pouring. Partially fill the mold and turn it all the way around in such a way that the resin does not flow out of the mold. Then fill the mold again with a quantity of resin and turn it around again. Continue until the mold is completely filled. Pay attention to the following points:
1 While rotating the mold, air must not be allowed to re-enter the tops
2 While rotating you can tap the container to loosen any air.
3 look in advance which side the fingertips are on and put a line on the container on that side. That way you know (when the mold is filled) where the difficult parts are and where the air has to come out of the tips.
Deformation of the thumb , comes from the alginate that was “too thin” on the thumb. Because it was so thin, it collapsed, tore and/or returned to the wrong place during filling.
You can imagine what I mean by this example: If I take a “too” small container to form my hand, my thumb will almost touch the edge. A thin layer of alginate will then form between my thumb and the edge of the container. When I remove my hand from the container, I will pull that thin layer away from the edge (even if I do it carefully) and perhaps even tear it. When I pour the acrylic resin into the mold, the alginate will snap back quite well, but not quite as it should. The result is a deformed thumb. The same thing happens if I do not put my hand in a mixing container but smear it with a “too thin” layer of alginate.
The solution is simple… by applying the alginate thicker (think at least 7 mm) the shape becomes more firm (more body).
What also helps is to make a connection between the alginate and the support cap. To do this, press cotton wool into the (liquid) alginate before applying the plaster cast. In this way, you make a connection between the alginate and the plaster cast.
This keeps the thin alginate in place and prevents it from deforming.
Thickening the resin, thickening the resin is only necessary if you are going to laminate or spread the resin. Thickening the resin before you start pouring is not advisable. The resin will then become less fluid and will therefore take over less detail.
2. Epoxy
2.1 Why does my epoxy have an orange peel appearance? And why do I sometimes get a wavy surface when working with epoxy?
1. Orange peel on epoxy :
Orange peel on epoxy often occurs due to irregularities in the surface during the curing process. This can have several causes, such as:
- Temperature fluctuations : Epoxy is sensitive to temperature changes. Avoid direct sunlight and ensure a constant temperature throughout the curing process.
- Contamination or greasiness : Make sure the surface to be treated is well degreased before applying the epoxy. For example, use acetone or water with ammonia to remove grease residues.
2. Wavy surface :
A wavy surface can be caused by uneven application of the epoxy. Some possible causes are:
- Incorrect mixing ratio : Make sure you mix the epoxy according to the correct ratio to get an even layer.
- Insufficient spreading : Apply the epoxy well with a roller or brush to create an even layer.
- Too thick a layer : If you apply the epoxy too thickly, it can lead to an uneven surface. Roll out the epoxy evenly, paying special attention to the edges and corners.
2.2 Why do I have wet spots in my epoxy layer? Why do parts of my epoxy remain sticky?
Epoxy gives a nice end result and is nice to work with, but...
Epoxy must be processed very precisely.
Therefore, follow this step-by-step plan:
1) Make sure the individual components are at room temperature (see the data sheet for the correct temperature)
2) Calculate the exact amount per component well. So keep the mixing ratio exactly. Pay close attention to the data sheet and pay attention to whether the mixing ratio is indicated in weight or in volume. This is almost never the same!
3) Use an accurate scale, especially for small quantities. A deviation of more than 1-3% per component can cause many problems. If the scale or volume syringe is not accurate enough for the desired small quantity, we recommend simply making more epoxy.
4) Mix in a cylindrical container (mixing cup) and not in a container with corners. Mix very well and especially include the bottom and sides. After mixing, pour the mixture into a new mixing cup and mix again. After creating a vacuum, pour/brush the epoxy into the mold/over the object with a thin stream. Do NOT scrape the bottom and sides.
5) Make sure the surface is dry, dust and grease free! Definitely prevent silicone contamination and moisture.
6) Ensure that the ambient temperature is the same during the entire curing period. Best equal to the given temperature in the data sheet (usually between 20 and 25oC)
7) Do not work in too high humidity. Certainly not above 80% but preferably below 60%.
8) Only use dyes and fillers that are suitable for epoxy. Never use too much dye as this often leads to surface problems and can also adversely affect other properties such as heat resistance.
2.3 How do I solve sticky spots in my epoxy layer? How do I work away sticky spots in my epoxy?
Sticky spots in the epoxy are not only unfortunate, but can also be frustrating. Especially if you have covered a large surface and have invested a lot of time and perhaps a lot of material.
The very best, but certainly also a lot of work is:
1) Pull off the sticky/liquid epoxy well with a plastic spatula. Do not pull too much over the good spots of epoxy.
2) Scrape away the remaining adhesive layer further with an iron scraper until you reach the substrate or well-cured epoxy.
3) If it is possible to treat the spot locally, then lightly sand this part including adjacent good parts, remove dust and pour new epoxy. If the piece cannot be treated locally because the damage is not deep enough or because there is a fear that the extra epoxy cannot flow out evenly, unfortunately the entire piece must be lightly sanded and poured over again.
There are sometimes possibilities to work a bit faster: In some cases where the sticky peoxy only forms small and especially shallow spots, it can be chosen to smear a 1-part PU lacquer over it. Whether this is a solution must however be tested on a case-by-case basis. PU lacquer such as: Yacht lacquer PU Semi-gloss
2.4 My epoxy coasters remain sticky or become sticky when I place a hot cup on them.
Hopefully you have chosen an epoxy for these coasters that can withstand temperatures of at least 80oC.
Make sure that:
- The epoxy has fully cured. This can take 2 to 3 weeks at room temperature (around 20oC)
- The epoxy should cure at a constant temperature and not be exposed to large temperature fluctuations. To speed up and facilitate this, you can also put the epoxy in the oven for 2 to 4 hours at 60oC. It is best not to use an oven in which food is also prepared.
- Don't use too much dye and certainly not too much alcohol tints. These will quickly destroy the heat resistance of the epoxy!
- Only use dyes suitable for epoxy.
- Make sure the epoxy is measured perfectly according to the correct mixing ratio and that you mix well. Preferably in 2 mixing cups (mix once in 1 cup, pour into the 2nd cup and mix again)
- Never include epoxy from the edges of the mixing cup in the final pour!
2.5 My epoxy coasters bend or dent when I place a hot cup on them.
Hopefully you have chosen an epoxy for these coasters that can withstand temperatures of at least 80oC.
Although the epoxy can withstand higher temperatures and will not scorch, melt or stick, the epoxy can indeed soften.
This certainly happens when the hot cup remains in one place for a few minutes. Because the epoxy temporarily softens, it dents. After cooling, the epoxy hardens again, which keeps the dents.
This is not really preventable. All clear (i.e. not filled) resins such as epoxy, polyurethane and polyester will dent under prolonged weight at elevated temperatures.
However, very high temperature resistant epoxy will dent less.
There are also highly filled epoxies that do not yield to temperatures above 140 oC. The disadvantage is that these epoxies are filled opaquely (often with aluminium powder etc.).
2.6 What is the best way to glue with epoxy?
Epoxy is a strong resin that adheres well to many types of surfaces.
Of course, as always, it is important that the surface is clean, dry and dust-free. Sanding the surface is also certainly recommended.
Epoxy is usually a very thin liquid. In order to better process the epoxy you have to thicken it by thickening agents such as talcum powder or fibers.
Epoxy can also be used as a filler in this way.
When you use Litefill or hollow glass beads as a filler, you can make a beautiful lightweight epoxy filler yourself.
3. Poly urethaan
3.1 Why do I need to post-bake polyurethane (PU) if it also hardens at room temperature?
Although polyurethane (PU) hardens at room temperature, this temperature is actually too low to fully develop all the desired properties. The idea behind post-baking is to further promote the hardening of polyurethane. In this process, the PU material is placed in an oven at a higher temperature (but certainly not too high!). This process has several advantages, including improved impact resistance and temperature resistance.
Some important points about post-baking:
- Optimal properties : Post-baking strengthens the molecular bonds in the polyurethane, making the material more durable and stronger. This is particularly important for applications where high mechanical loads or temperature variations occur.
- Demoldability : Post-baking usually occurs after the PU product has been removed from the mold. However, it can also occur in the mold. If you do it out of the mold, you must ensure that the temperature remains below the glass transition temperature of the product to avoid deformation.
- Time and Temperature : The duration of the post-baking varies, but it usually takes a few hours. The exact time depends on the type of polyurethane and the desired properties. Make sure you follow the recommended temperature and time for the specific PU material you are using.
- Oven Use : Use a separate oven for post-baking that is not used for food preparation. This prevents cross-contamination and ensures that the polyurethane is cured safely.
In short, post-baking is an essential step to optimize the desired properties of polyurethane. Make sure to maintain the correct temperature and time to achieve the best results!
4. Siliconen Culinair
4.1 Is silicone culinary suitable for soap molds?
The silicone Culinair is very suitable for making soap molds. You can also use the cheaper condensation silicone C 20 A +B for this. These are also excellent for pouring or spatulating soap molds.
The flexibility of both silicones is high and therefore suitable for detailed soap molds.
The biggest difference between the two types of silicone can be found in the mixing ratio:
- Silicone Culinary is 1 part A + 1 part B.
- Silicone C 20 is 100 parts A + 2 parts B.
Price-wise, it is best to use condensation silicone "Silicone C 20 A + B" or the addition silicone "Silicone A Pink or Yellow". The condensation silicone initially gives off a slight odor. This disappears over time. You can also put this silicone in the oven for 2 hours at 100 degrees and then (let it cool down first!!) wash it in soapy water and dry it. That way the odor is gone too.
4.2 How many liters is 1 set of Silicone Culinary?
A set of Silicone Culinary weighs 1 kg. The density of this silicone is 1.05 kg/ltr. This means that 1 kg of silicone is equal to 950 ml.
4.3 What temperature can Silicone Culinary withstand?
All silicones in our webshop can withstand temperatures between -20°C and 240°C. The silicones C HT 40 can even withstand temperatures of 380°C (short-term). The Silicones culinary can easily withstand temperatures from -40°C to + 280°C for a very long time (hours to days). This makes the silicones suitable for both the freezer and the oven.
4.4 Can I bake a cake in the silicone culinary?
The "Culinary Silicones" from our web shop are ideal for casting a cake mold. Under the heading applications you will find an example of a rubber duck cake. There are (in the case of a cake) a number of things you need to take into account: - The silicone will be quite thick/solid in certain places. In these places it takes longer for the heat to penetrate the dough. For this reason the cake will have to be in the oven a little longer.
-Where the silicone is less thick, and therefore less solid, the heat will reach the dough faster. In these places the dough will be done faster than in other places. (see example rubber duck the dark places are the places where the silicone was thin).
In places where the silicone is thin, the mold may also give a little when the cake starts to rise/expand.
-Models with very high detail or thin protrusions may break off the cake when demoulding.
4.5 My Silicone Culinary mold is sticky.
If the mold (made of Silicone Culinary) feels sticky and soft after curing, there are a number of possible causes.
1. The 1:1 mixing ratio has not been observed or has not been observed sufficiently. Too great a difference in the mixing ratio results in no or partial curing. This results in a sticky and soft and less strong end result.
2. The master model, casing or release agent contains one of the materials which negatively affects the curing process of these silicones.
It is best to process the silicone at room temperature.
To ensure proper curing, we always recommend setting up a test with the materials used. If the silicone in the test is not affected by the materials, it will not be affected in the final casting either.
For more information, see also the FAQ on curing (Addition) Silicones below. Why doesn't my silicone cure?
4.6 Can I make culinary silicone candy molds?
You can certainly cast bonbons in culinary silicone. You can make the model shapes well from Fimo clay, plasticine or other materials. Preferably use white plasticine or white fimo clay (so that the silicone 100% certainly does not discolour). The silicone mould that you make from this later takes over all the details. A release agent between plasticine or fimo clay for release from the culinary silicone is not necessary. With chocolate, remember that chocolates will not shine if the original model does not shine either! This is often required by professional chocolatiers because the chocolate then automatically looks more appetising. If it is a "must" that the chocolates shine, there are 2 possibilities: 1: The mother model must shine as the chocolate should shine later. 2: the dull chocolate can be sprayed with (edible) alcohol. This partly dissolves the outer layer and then evaporates. This will make the chocolate shine.
Remember that chocolate is an aggressive material. This will eventually affect the shine of the silicone culinary. The silicone mold will still work fine, but the chocolate bonbons will no longer shine strongly. We will soon offer a silicone that is more resistant to chocolate.
5. Silicone
5.1 Bonding silicone
Silicones are difficult to bond. Especially when you use standard adhesive solutions.
Silicones are best bonded with condensation silicone. These can be the 2-component condensation silicones from our webshop . They can also be the 1-component condensation silicone adhesives such as this one .
Often a simple construction silicone sealant works well too.
Condensation silicones often adhere well to condensation silicones and to various surfaces. If adhesion is desired on a surface where the condensation silicones do not adhere well, you can use a primer .
Addition silicones do not bond well to themselves. The best chance to get them to bond to themselves is to cut away a thin layer at the contact surface so that the grainy fresh structure of the cured silicone is exposed. This primer can then possibly be used on this.
Addition silicones adhere less well to certain surfaces than condensation silicones. These primers can offer a solution. Many bonds only work after a few days and preferably after curing at a higher temperature.
Cured silicone can be bonded to each other and to other surfaces using silicone sealant or our silicone adhesives . The disadvantage is that these harden slowly. A faster solution is this set of a good cyanoacrylate adhesive (superglue) with a special primer for silicone. This hardens quickly and bonds well, but it does harden the silicone at the point of contact, which reduces the flexibility at that point.
5.2 After pouring there are air bubbles in my mold, why is that?
When processed correctly, there should be no or almost no air bubbles. A few tips that will minimize the amount of air bubbles or (in most cases) not appear at all.
1. It is possible that the silicone hardens too quickly by adding too much B-component (more than 2%). The air bubbles do not get enough time to escape. The best solution for condensation silicone would be to add 1.5% B-component. The de-moulding time is extended by this, which gives air bubbles more time to disappear. Remember that the weights count fairly precisely. With a dosing syringe you can measure grams very accurately. (1 ml is 1 gram in this case). Addition silicone can be slowed down by making the components slightly colder before using them. Temperature strongly influences the hardening time of addition silicone.
2. It is also possible that too much air is beaten in during mixing. Because mixing is done "whipping". Try to beat as little as possible but stir the components together.
3. Pour from a reasonable height (e.g. 50 cm) and with a thin stream. During the fall, the last air bubbles will also burst.
4. If you want to be sure of a mold without air bubbles, you can also pour a thin layer of silicone over the models first and then go over the model with a brush. When you have finished brushing and there are no more air bubbles, you can pour the rest of the mold.
Finally, I would like to say that the silicone is always tested before it is packed and shipped. None of our tests may contain air bubbles. Of course, we do not use vacuum or vibration machines for testing.
5.3 Will silicone stick to my clay model?
Will silicone stick to my clay model?
A model made of untreated/unpainted clay (dried or baked) will indeed give problems when releasing. To release silicone on clay you can use a release spray but there are also simple methods with household materials: Provide the model with Vaseline, beeswax, furniture wax or shoe polish (preferably colourless). The pores of the clay are sealed as it were and a release is guaranteed. To be able to apply the wax layer as thinly as possible, you can dilute the wax with turpentine and rub the mixture with a brush or cloth. After the entire model has been provided with the mixture, the turpentine will evaporate and an extremely thin layer of wax will remain.
5.4 Cutting silicone?
Cutting silicone is easy if you follow a few rules:
-always use a sharp (stanley) knife.
-preferably use a long knife, i.e. a long cutting edge.
-do not cut like a saw, but pull the knife in 1 cut to the desired depth.
-If it is necessary to make a second or more cuts, follow the existing cut at the deepest point and again do not saw.
-It is always helpful to have a second person unfold the cut, this way you can cut more easily and the previous cut becomes easier to follow.
-Make sure (if possible) that you always cut in the shape of a sawtooth. This will give you a mold that fits together nicely later and gives less chance of a seam.
-If the cut stops in the mold and does not go all the way through, try to end this cut round. This will prevent the cut from tearing too easily.
5.5 Which silicone can I cut?
Cutting into a silicone mold is generally avoided because the chance of the silicone tearing at this point increases. However, in some cases, cutting is a simple solution for creating a better release of a complex model. If you want to cut into the mold (and are not going to process food in the mold), it is best to use silicone C 20 A with silicone C 20 B from the shop. This silicone has, compared to other silicones, a superior tear strength. It is useful to pour/spatula the parts where you will later cut slightly thicker than is normally used. In this way, you give the silicone slightly more strength. In addition, it is advisable (if possible) to make a zigzag cut. In this way, the mold always closes correctly. If necessary, you can place an elastic band around the mold (not too tightly because then the mold will deform).
5.6 How do I remove the fraying from my mold?
The best way to make a mold without fraying is to attach the mother model to the surface and to fill all the gaps under the model very carefully with Plasticine so that no silicone can run under the model. This often takes a lot of time, but the result is immediately very professional and post-processing/cutting is often much less or even no longer necessary. However, it is sometimes not possible to reach all the gaps and fill them nicely. In that case, it is still necessary to cut away the fraying/fleeces. -Always use a sharp Stanley knife. -Hold the fleece with 1 hand and pull gently, cut with the other hand and follow the shape. -Never pull too hard on the fleece, this will stretch the mold and in many cases it will appear when you let go that you have cut too far. -If necessary, you can go under the fleece with a finger, with the sharp knife you push lightly at the top, now pull on the fleece, the fleece will tear off along the knife. This technique may take some practice :) Of course, in both cases be careful not to cut yourself.
5.7 How do I color silicone and can silicone be painted?
Silicone is almost impossible to paint . This can only be done properly by damaging the skin and spraying colored silicone (for example by spraying colored silicone dissolved in thinner onto the silicone). Also, make-up mixed with silicone sealant is often used.
Silicones can be colored well. For this you can use silicone dye or oil-based semi-gloss paint. Please note: we recommend always testing dyes outside the webshop first because the dissolving power in the silicones can differ. Products in the paint can also slow down the hardening of silicones or even stop them completely. Oil-based paint also significantly reduces the hardness of silicones!
Finally, please note that naturally white silicones will give a slightly paler colored result (pastel-like) than transparent silicones.
There are also products with which you can paint addition silicones. We offer the LSR Topcoat for this, among other things. This is actually a 2-component addition silicone that does adhere to other addition silicones. These silicones have a pot life of many hours at 20 oC and harden well within a few minutes at 180 oC. You can give these silicones a color with silicone dye, so you actually make your own ink with which you can paint or spray on hardened silicone. An additional nice effect is that these silicones matt and that these silicones conform to food contact regulations of FDA and Bfr. This product is a bit more expensive, but with a layer thickness of less than 1 mm you can do a lot!
5.8 Is a release agent necessary?
To release silicone from various materials, you can use a release spray, but there are also simple methods using household materials: Apply a layer of Vaseline, beeswax, furniture wax or shoe polish (preferably colourless) to the model. The pores of the porous materials are sealed, as it were, and release is guaranteed. To apply the wax layer (or Vaseline etc.) as thinly as possible, you can dilute the wax with turpentine and rub the mixture in with a brush or cloth. After the entire model has been provided with the mixture, the turpentine will evaporate and an extremely thin layer of wax will remain. Incidentally, in many cases it is not necessary to use a release agent. Set up a simple test in advance, for example on the bottom of the model. Materials that almost always require a release agent are: Dry/baked/untreated clay, cardboard, untreated wood, fabric, paper and other dry/porous materials.
5.9 Castable Silicone VS Kneadable Silicone.
|
Characteristic |
To pour |
Knead |
More info |
|
Takeover detail |
X |
Liquid silicone takes over the smallest details of the model, gaps and undercuts are no problem. Kneadable silicone often has trouble with detail or deeper areas. |
|
|
Coloring |
X |
Coloring cast silicone is easily done by adding a colorant paste. Coloring kneadable silicone is generally done in the factory. |
|
|
Mix |
X |
Mixing the kneadable silicone is easy. A mixing bowl or spatula are not needed. Mixing casting silicone requires a mixing bowl, spatula and a bit more effort. |
|
|
Process |
X |
For the processing of kneadable silicones you do not need to use containers or the like to pour into. The casting silicone requires preparation in the form of placing a casing and possibly plugging the gaps through which the silicone can flow away. |
|
|
Use after curing |
X |
A cast model always has a straight top (level) and is therefore immediately ready for use. Kneadable silicone is not straight and must be level and fixed before it can be used (in the case of casting in chocolate, for example). |
|
|
Support cap |
X |
Larger models of cast silicone can be placed on a baking sheet and are ready to use. Larger models of kneadable silicone should be provided with a support cap or something to lie level and in the original shape. |
|
|
Air Entrapment |
X |
Liquid silicone will seep into all the cracks and holes and is self-venting. Kneadable silicone will often trap air. |
|
|
Processing time |
X |
Because the casting silicone has a longer processing time (40 minutes) there is no need to rush. Kneadable silicone has a shorter processing time (10 minutes). |
|
|
Material waste |
X |
Kneadable silicone can be applied to the model in the desired thickness, whereas with casting silicone it is necessary to fill the entire container. |
|
|
Fragile Mother Models |
X |
Extremely fragile models can be moulded very well with casting silicone. Kneadable silicone often requires a little more force/pressure to be applied. |
|
|
Complex models |
X |
A complicated model (e.g. a three-master boat) can be cast easily. Processing kneadable silicone becomes difficult or impossible. |
|
|
Simple models |
X |
Simple models (think of medals, tokens, buttons, coins etc.) are very easy and quick to form with kneadable silicone. Casting silicone is possible in this case but very laborious. |
|
|
De-moulding |
X |
Demoulding of cast silicone (both from the master model and from the copy) is easy due to its great flexibility. Kneadable silicone is often somewhat stiffer and has less stretch. |
|
|
Price |
X |
Liquid silicone is often more favorable in price than kneadable silicone. |
|
|
Measuring mixing ratio |
X |
Measuring the mixing ratio is easy to do by eye with kneadable silicone. Casting silicone requires a scale or measuring cup. And listen fairly precisely |
|
|
Temperature |
X |
With their range of -40 to + 280, the casting silicones have a slightly higher resistance than the kneadable silicones (up to +250). |
5.10 Writing on silicone?
This is a familiar problem with silicone molds. You can't write on silicone with anything. However, there is a method to mark a mold:
Before you start pouring the silicone, write the name or numbers of the model in mirror writing in the casting tray with a waterproof marker where the text should be. After demoulding, you will see that the text is positive in the silicone. The text is indelible and can simply be put in the dishwasher. This method works mainly with Silicones A and B (Poly condensation silicones) and Silicone High temperature. This method works less well with Silicone Culinary (poly addition).
5.11 What does (Shore) hardness stand for?
What is the difference between hard and soft silicone?
The hardness indicates how easy it is to push a product. The described scale for this was invented by Albert Shore. That is why this value is called the Shore hardness.
Because the hardness of materials can vary from a gel to a hard plastic, the Shore value is divided into different categories. These categories are related to the test instrument with which the measurement can be made. A Shore OO meter has a different point on the meter than a Shore A meter and is therefore more suitable for soft materials. A Shore D meter also has a different point and is more suitable for very hard materials.
The categories have some overlap. For example, Shore A 78 is equal to Shore D 10 etc. Below is an overview of the different Shore values.
5.12 Pouring Silicone into a Silicone Mold
When pouring silicone into silicone, it is wise to first apply a release layer.
For example, you can grease the mold with Vaseline and then polish it again with a cloth. (Repeat this 3 times to get a nice release.
A nice silicone for making such a mold is the silicone: Transparent 15 Normal .
5.13 What is the difference between addition and condensation silicones?
The chemical difference between condensation crosslinking and addition crosslinking silicones is in the way in which polymerization takes place. In other words. Condensation silicones form long chains in a process in which part of the material condenses (separates). This separation is the reason why the total volume of the silicone decreases and the silicones therefore have more shrinkage than addition silicones. Addition silicones do not separate substances during the formation of long chains and are therefore less shrinking. Condensation silicones require tin salts as a hardener. Condensation silicones can slowly sweat out these (excess) salts. Tin salts are harmful to health and therefore molds made of condensation silicone are not suitable for use as food molds. Addition silicones work with platinum salts. Addition silicones do not sweat out a product (partly because fairly precise mixing ratios must be used).
Condensation silicones continue to react and form chains after the A and B components have been mixed. These silicones therefore continue to exude material. As a result, these silicones will shrink more and more over the years. These silicones will also become increasingly brittle/crumbly. The advantage of continuous polymerization is that these silicones also adhere to new condensation silicones when they are applied to an old silicone casting. That is why, especially with a two-part mold of condensation silicones, there must be a good separation between the two layers during the casting of the second part, otherwise the silicones will adhere.
Addition silicones stop reacting/polymerizing at a certain point. Often they actually stop too early. That is why it is recommended to "post cure" addition silicones (place them in an oven at 80-100oC for a considerable time). In this way, further polymerization can be forced so that no "unreacted" material can escape from the silicone.
Condensation silicones need moisture to harden. They get this moisture from the silicone itself and from the environment/air. That is why these silicones harden faster when the humidity is high. This is also the reason why you should close the condensation silicone well after use because otherwise the moisture will evaporate. Addition silicones need heat for hardening. All addition silicones harden faster at higher temperatures. Many addition silicones do not harden or harden poorly at low temperatures (already noticeable at temperatures below 18oC). Sometimes addition silicones are used slightly cold to extend the processing time.
Condensation silicones are less resistant to chemicals and resins than addition silicones AFTER curing, but before and during curing these silicones can actually better withstand contamination. Addition silicones often do not cure or do not cure well when they are contaminated by, among other things: tin salts such as condensation silicones (so never use a condensation silicone mold for addition silicones), various glues, phosphorus, arsenic, nitrogen, 1 component silicones and sulfur (so also various sulfur-containing latex gloves). If you are unsure whether the silicones you have chosen can withstand the other materials used, we advise you to always set up a small test (on a part of the original) where this can do no harm.
Mixing ratios are less important with condensation silicones. If you add a little too much catalyst, the curing will proceed faster and you will have a shorter processing time. However, too much excess will cause negative effects such as a less strong silicone. Too little catalyst will cause the silicone to harden very slowly.
Addition silicones must be mixed very precisely, a deviation above or below will cause the silicones to no longer harden. In the best case, this can be remedied by post-curing in the oven at 100oC, but usually the result cannot be saved. The silicones become sticky and soft.
Condensation silicones work with tin salts and are therefore also called Tin Hardening Silicones. Addition silicones work with platinum salts and are therefore also called platinum silicones.
Do you know the difference between Addition and Condensation silicone?
5.14 How do I make a silicone mold?
For this, please see our overview of manuals
In this video you will see how you can easily make a two-part mold from a 2-component silicone. The silicones and all kinds of other materials with which you can make your own molds or cast a model, for example, can be found at www.Siliconesandmore.com!
The easiest way to make a silicone mold
In this video you will see how you can easily make a two-part mold from a 2-component silicone. The silicones and all kinds of other materials with which you can make your own molds or cast a model, for example, can be found at www.Siliconesandmore.com!
5.15 Why doesn't my silicone cure?
The answer to this question depends on which silicone you use. Namely addition silicone (All Silicone A) and condensation silicone (All Silicone C)
Regarding Condensation Silicone there are often 4 options:
-There is no hardener. You forgot to mix B component with A component before pouring the silicone. In this case the silicone will NOT harden anymore.
-You have added less than the recommended amount. The ratio of A to B is not weighed accurately and results in less than the recommended % B component. In this case the silicone will harden but it will take longer. (in the worst case even 2 to 3 days longer). Note that using a very old hardener has the same effect as adding too little hardener.
- You accidentally did not use the right hardener. In all your enthusiasm, haste, inattention you accidentally did not add the B component but another liquid that looked very similar.
- There is too little moisture in the air or in the silicone. Condensation silicones contain moisture. If you store this silicone unsealed for too long, the water in it evaporates, which means that the silicone will not harden as well later. The moisture from the air is also used during the hardening process. If the humidity is below 40%, this has a major impact on the hardening times.
Condensation silicones draw moisture from the air and surrounding materials to harden. At very low humidity (by heating or stove) and when the silicone is sealed by a non-moisture-retaining material such as plasticine, hardening on that side can take much longer. We then recommend:
- Make the air more humid
- Use a little more force (3% instead of 2%)
- Lightly moisten the plasticine surface. Be careful that no drops are visible, because they will also return to the silicone
Although the causes are very obvious, even the most experienced user can make the mistakes described above.
There is no real solution when you have already cast silicone with condensation. At most you can try to increase the humidity and be very patient (sometimes for days). If you have not added a B component the product will unfortunately never harden. You will then have to scoop the silicone away and remove it with an old cloth. A very thin residue of silicone does not matter because with newly applied silicone it simply hardens.
With regard to Addition silicones, there are stricter rules regarding mixing than with condensation silicones:
- Addition silicones have an A and B component that are precisely matched to each other. Therefore, only use A and B components with matching batch numbers. Keep the proportions exactly.
- The platinum in the catalyst is very sensitive to chemical contamination of, among other things: phosphorus, sulphur (also sulphur-containing latex gloves), tin salts (these occur in condensation silicones), nitrogen, arsenic, PVC stabilisers, and epoxy catalysts. When the catalyst comes into contact with one of these substances, the platinum will react with it and therefore no longer react sufficiently with the silicone itself. These substances occur in, among other things, sulphur-cured rubbers and latex, condensation silicones (including silicone sealant), rotten food and various adhesives.
- The temperature is too low. Additive silicones need a certain temperature to harden. Usually a temperature above 18oC is sufficient.
Because of this sensitivity of addition silicones we always recommend to set up a small test with the materials you are going to use. This way you can easily determine whether the end result will harden.
Here is a list of reasons why silicone does not cure.
There is also no real solution for addition silicone that has not or not properly cured. You can only try to free the silicone from the material that prevents it from curing and then place the silicone in the oven at 100 degrees for a few hours.
6. Alginate
6.1 How do you hang a hand wreath?
If you want to hang it, you can very carefully drill a hole and attach a screw. Start with a very thin drill bit and work your way up. You can secure the screw with a mounting kit or strong glue.
6.2 Making an Imprint of Your Chest/Upper Body
Option 1:
The basis for this print is the Pregnant Belly Set.
- Preferably do this together with 1 or 2 people! This is a job that requires a lot of hard work.
- In principle, the manual should be sufficient.
Option 2:
- The simplest and cheapest method is plaster cast .
- After the plaster cast has hardened, you can treat it with sealer .
- This sealer seals the plaster and creates a film layer between the latex and the plaster.
- If necessary, apply Vaseline ointment to the skin beforehand, especially if the torso contains chest hair, and apply Vaseline to the skin.
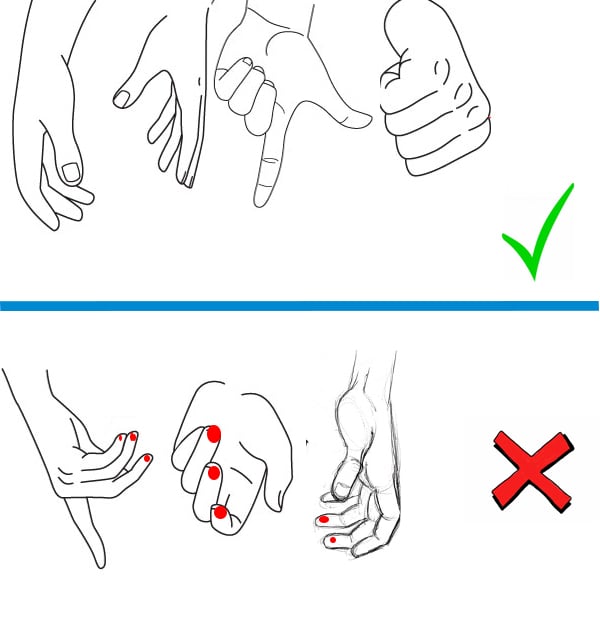
6.3 What is the best way to hold my hand?
NOTE: There are hand positions that cannot be used properly. This is because when casting plaster, air is trapped in the alginate. This will result in missing fingertips.
Make sure that the air can always escape (diagonally) upwards. If a finger is bent, this is not possible. In that case, the fingertip must touch the palm, so that the air can still escape via the palm. In the good examples of the fist and the shooting position, the fingertips that are bent touch the palm so that the air can escape via the palm.
The bent fingers in the wrong examples do not touch the palm. The red spots indicate where air is trapped and cannot escape. These often become missing fingertips. 
6.4 My fingertips/toes are missing, how is that possible?
Missing fingertips have a known cause and have nothing to do with lumps in the alginate.
What happens here is that air that is in the fingertip while you are pouring plaster into the mold cannot escape and therefore accumulates in the fingertip. So no plaster can get here and the result is a missing fingertip.
We have also indicated this in point 5 of the manual.
The solution:1
1) Rotate the mold to allow air to escape (see point 7 in the manual).
2) Avoid these types of dead spots (see point 5 in the manual)
3) Try to pierce these points with a skewer or something similar, so that the air can still escape.
We also mention this problem a few times online because we want everyone to get a good result.
NOTE: There are hand positions that cannot be used properly. This is because when casting plaster, air is trapped in the alginate. This will result in missing fingertips.
Make sure that the air can always escape (diagonally) upwards. If a finger is bent, this is not possible. In that case, the fingertip must touch the palm, so that the air can still escape via the palm. In the good examples of the fist and the shooting position, the fingertips that are bent touch the palm so that the air can escape via the palm.
The bent fingers in the wrong examples do not touch the palm. The red spots indicate where air is trapped and cannot escape. These often become missing fingertips.
Working on these kinds of mistakes is very difficult and can only be done well if the casting was in acrylic resin. Acrylic resin bonds to itself and can be thickened so that you can carefully make something on top, but that requires a lot of practice.
6.5 Make a copy of 2 adult hands and 2 child hands in 1 casting.
1) Think of a nice position / attitude of the hands, where it is important that when you have the mold there are no dead-end "tunnels" upwards where the air can be trapped. See picture below. If the fingers touch another hand or the palm, the air can usually escape again.
2) Find a bucket that is big enough but certainly not too big, because that takes far too much material. Practice the position of the hands in it.
3) Keep your hands in and fill the bucket with water to the height you want the mold to be. Remove your hands and weigh or read how much water you have used.
Divide the water by 4 to get the WEIGHT of alginate. For example, if you used 4 liters of water (which is exactly 4 kg of water) then you need 1 kg of alginate. This is also included in the kit.
If you needed more than 4 liters of water, you will either need to buy extra alginate (0.5 kg alginate for every 2 liters of water) or use a smaller bucket.
4) This is not a certainty, but we use the table below as a guideline for how much plaster you need per hand:
|
Baby hand 0-1 year |
550 ml mixing cup |
96 gr. Alginate + |
150 gr. plaster + |
|
Children's hand 2-10 years |
1100 ml mixing cup |
168 gr. Alginate + |
300 gr. plaster + |
|
Woman's hand/child >10 |
1100 ml mixing cup |
204 g alginate + |
600 gr. plaster + |
|
Male hand |
1900 ml mixing cup |
288 g alginate + |
800 gr. plaster + |
For 2 children, 1 woman and 1 man we would guess 2X300+600+800 = 2 kg. That is exactly what is in the set, but depending on how big the hands really are it can be tight or loose.
Usually it is sufficient if the cast only extends to the beginning of the wrist.
5) Please follow the instructions in the manual carefully. Use good cold tap water otherwise it will go too fast. Mix with a mixer or a drill mixer. Check carefully whether the drill or the mixer can reach the bottom well before you start. If this is not the case, mix in a mixing bowl and pour immediately after mixing into the desired bucket. Do NOT mix longer than 40 seconds, if there are lumps left that is not a disaster.
6) Immediately put your hands in and rub them together well to release all air bubbles from your hands.
7) After the alginate is creamy white again, carefully remove it by wiggling with your hands to release the vacuum.
8) Mix the right amount of plaster immediately and pour it into the mold. Do not wait longer than half an hour. If you think that some fingers are crooked. First fill the mold half full and turn and tilt so that all the air can escape and then fill the mold further with plaster.
9) Wait with demoulding until the plaster is well hard (about 1 hour) demould carefully because the plaster is still and details are easily lost. Then let dry further for 1 day before you grab it too much.
10) If you want to paint or seal the statue, wait a week so that the plaster is really completely dry. We recommend sealing the statue if it is touched a lot because otherwise it will quickly become dirty.
6.6 Pimples/Bumps on the plaster cast
If there are pimples on the plaster it means that there were air bubbles in the alginate.
These pimples are usually not a problem if there are only a few of them.
You can prevent pimples in the first place (or almost) by tapping the bucket of “liquid” alginate vigorously before putting your hands in it.
This way you force air bubbles to rise to the top and escape from the mixture.
If the alginate contains fewer air bubbles, put your hands in it and rub the skin well so that any air bubbles come loose from the hand.
Then you keep your hand still until the gel has hardened.
It is best to remove pimples before the plaster has completely hardened.
This makes removal quite easy, so no sanding or hard scrubbing is required.
6.7 What do I need to copy 2 adult hands?
We have developed a special Bodycasting Set for casting two (adult) hands.
This set contains mixing cups, plaster, alginate and (not unimportantly) clear instructions.
6.8 Moulding a (baby) hand or foot with alginate 3D gel.
We have written an extensive manual for this
6.9 Face shaping using alginate.
Always work with 2 people to mold a face. One person lies down to do the molding and the other mixes the material and pours it into the box. +
Method:
-take a box about the size of the face (eg: shoe box).
-in this you cut a hole slightly larger than the face.
-stick tape (e.g. paper masking tape/painter's tape) along the edges, making sure that it protrudes about 1 cm over the edge.
-If you now put your face in the hole, the tape will ensure that the holes and cracks are sealed nicely.
-put wads of toilet paper or something similar in your nostrils so that no material runs into the nose.
-take a tube that you can easily breathe through. Practice this beforehand! A straw is waaaaay too thin, a yellow pvc tube (arrow tube) is usually more than enough.
-Now lie down and press the box firmly onto your face so that everything fits well all around.
-mix the correct amount of alginate with (lukewarm) water using a mixer.
-fill the box until the desired amount is full.
-wait 5 minutes (until the gel has hardened) before de-molding.
-carefully remove the box (tube and all) from the face.
-pour the desired product into the mold within 4-5 hours.
Remember to make enough alginate at once, if the mixture turns out to be too little (and for example the nose still sticks out and is not covered) you cannot make new mixture and pour it over, it will not stick!
Nothing can be said about the required amount of 3d gel. The amount depends on the size of the box used. Always make a good calculation in advance. Often 2 packages of alginate of 2 x 500 grams) is enough (3-4 liters total product).
6.10 Guidelines for materials required for making a plaster cast.
|
Baby hand 0-1 year |
550 ml mixing cup |
96 gr. Alginate + |
150 gr. plaster + |
|
Children's hand 2-10 years |
1100 ml mixing cup |
168 gr. Alginate + |
300 gr. plaster + |
|
Woman's hand/child >10 |
1100 ml mixing cup |
204 g alginate + |
600 gr. plaster + |
|
Male hand |
1900 ml mixing cup |
288 g alginate + |
800 gr. plaster + |
7. How do I make?
7.1 How do I make a silicone bracelet myself?
Mother model: The mother model can be made from different materials. Always keep in mind that the result is determined by the mother model. The finer/more beautiful the mother model, the finer/more beautiful the final model. When using synthetic clay, plasticine or polymer clay, it is difficult to make details and sharp cuts (because these kneading masses are very soft). For this reason, we recommend hard modelling wax (from the webshop).
Production mold: The mold in which the silicone bracelet is cast is made of synthetic resin. This makes it impossible for the cast to adhere to the mold, making a release agent unnecessary. We recommend using the Polyurethane casting compound from the webshop for this mold.
Bracelet: The bracelet is (probably) worn on the skin. For this reason we recommend using addition silicones such as "Silicone A Pink, Yellow or Green" or "Silicone A Translucent" or even better "Silicone Culinary". Addition silicones are more skin-friendly than condensation silicones (such as Silicone C 20) and Silicone Culinary are food and skin safe. You can optionally colour them with the colour pastes from the shop. Please note that the silicones are white by default, which makes the colours somewhat pastel-like.
7.2 How do I shape a wooden hand?
We recommend 2 ways to make the mold:
1) Alginate: very easy to use, the mold is ready to use in 5 minutes, the alginate is flexible and comparable to very thick custard pudding (if it does tear during the demolding of the original, it will automatically fall back into place after demolding). The disadvantage is that the mold can only be used once and must be used within 12 hours after forming (after 12 hours the mold will lose water and thus model). This material cannot be used well for undercuts. Lubricate the wooden model (if unvarnished) with Vaseline ointment, shoe polish (colorless), beeswax or the like.
2) Silicone: 12 hours de-moulding time, reasonably flexible (can be made more flexible by adding silicone oil, see webshop), very strong and very often usable, possibility to cut in to facilitate de-moulding, also with undercuts. When pouring a wooden model, it is important to pre-treat the wood. Varnish the wood or grease it with; Vaseline ointment, shoe polish (colourless), beeswax or similar
7.3 How do I make a copy of an existing image?
A mold can be made of almost any object. The shape and detail of the model determine the difficulty of the mold. For example, a mold of a flat tile is very simple compared to a mold of a statue that Michael Angelo once carved out of a stone. The manuals on our site already provide a lot of information about how to make a mold, both single and multi-part. To cast a mold, you need silicone (silicone A + silicone B). To cast a statue, there is a choice of several casting materials. For example, you can choose from Porcelain plaster, Acristal Prima, casting wax or Polyurethane casting system. See documentation for the different properties.
7.4 How can I make molds for fun jewelry?
Gemstones/jewelry are made from various materials ranging from fimo clay to resins such as polyurethane, epoxy or polyester. Depending on the aggressiveness of the material used and the difficulty of the original, you can choose from various silicones to make the mold. Condensation silicones such as silicone C 20 or addition silicones such as "Silicone A Pink, Yellow, Green or Transparent".
Condensation silicones are less demanding during curing and cheaper. Unfortunately, they are also less resistant to epoxies and other resins, especially if the shape is very voluminous and generates a lot of heat. Addition silicones are better able to withstand aggressive resins and are more dimensionally stable. Unfortunately, they are also often somewhat more expensive and can be sensitive to contamination before and during curing. Contamination of addition silicones can reduce or even completely counteract curing.
7.5 How can I make molds for miniatures?
This depends on the type of miniatures you want to make. Pewter miniatures can best be made using a mold of Silicone C HT 40. This silicone can withstand temperatures for pewter (before use, powder the mold with talcum powder). Molds for miniatures of polyurethane casting system D80, Acrylic One, wax or plaster can optionally be cast from Silicone C 20. For other more aggressive or sensitive materials such as PU crystal clear, it is better to use Addition silicones such as "Silicone A Pink, Yellow, Green or Transparent".
Edible miniatures can of course only be cast in the Culinary Silicone or Culinary Plastique.
7.6 How can I make soap molds?
For this you simply use the Silicone C 20 A and B component. For instructions on how to make a casting mold or a spatula mold, see our documentation tab. Note: for very aggressive ingredients or very basic soaps, you may be better off using Addition silicones such as "Silicone A Pink, Yellow, Green or Transparent".
7.7 How can I make candle molds?
For this you simply use the Silicone C 20 A and B component. You can also use the silicone Thixo C if the candles are very large and you do not want to cast the entire model in a casing. For instructions on how to make a casting mold or a spatula mold, see our documentation tab. As an alternative to condensation silicones that shrink somewhat over the years and that initially give off a little odor, you can also use Addition silicones such as "Silicone A Pink, Yellow, Green or Transparent".
Extra long Christmas break? This is a fun Christmas activity. Easily make your own poured candles from your own chosen objects. You can copy an existing candle or choose something yourself to make a candle from.
7.8 How can I make molds for cement and concrete?
For this you simply use the Silicone C 20 A and B component. For instructions on how to make a casting mold or a spatula mold, see our documentation tab. These silicones are very suitable for cement and concrete and are also very tear-resistant. Even if these silicones do tear, they will not tear straight through. The tear will zigzag and therefore cause less damage or even stop in time. In addition, these silicones are easy to repair by applying new silicone C 20. For very large shapes, these silicones can easily be made spatula-able using thixo C".
7.9 How do I make realistic Skin with Fat Blubbers?
The soft flex 0035 is actually meant to imitate skin so it will come pretty close.
Adding oil reduces hardness and often increases elongation.
The strength does decrease and at a certain point (if too much is added) the strength is too low for the desired application.
When it does, it really depends on the application. If you want to make a silicone that is going to be stretchy and stretched a lot, you don't want to lose too much strength. If the silicone is just going to be felt and squeezed occasionally, a lot of oil is less serious.
Another point about oil is that it does NOT crosslink in the silicone system. This means that over time and especially under pressure (its own weight for example or when bending for a long time) it forms an oil layer on the silicone skin. This can also cause discoloration in for example the stone, paper or cardboard it is on.
The mold can be made from many products such as alginate, plaster, acrylic resin, wax, polyurethane etc.
Always do a small test to check 2 things:
1) Is the surface of the mold not too porous and therefore no adhesion? If so, you will have to varnish and/or use a release agent such as Vaseline or one of the release agents in our webshop.
2 Is the mold material used or one of the other products (lacquers or glues etc.) not poisonous for the silicone? If so, you should use another product or put a PVA layer over it. The advantage of softflex is that it contains a lot of platinum and therefore has little trouble with poisoning.
Note that the softflex is quite fast. So don't make too much. Stir gently so that as little air as possible is captured and pour quickly in a thin stream into the mold.
7.10 How do I make a reusable mold of a hand?
If the mold needs to be preserved, it is better to use silicone instead of alginate.
A commonly used silicone for this is the transparent 15 fast
These silicones are quite fast (10-12 minutes curing time), safe to use on skin and quite fluid.
The silicone is also sometimes smeared on to form a kind of glove mold.
For this purpose, they are made thicker so that they can be ironed.
You can thicken the silicone by using a thickener (thixo).
For applying the 3 hands, a 1.1 kg set of silicone A transparent 15 fast and 50 grams of thixo A is sufficient.
Of course it depends on the thickness at which you apply the silicone.
7.11 How do I make an Epoxy Hand from a Plaster Hand?
What you want is certainly possible, but it does require patience and some skill and a completely different approach than you might think.
You cannot use the casting you have in an alginate mold.
The reason for this is:
1) that you must be able to move your hands to remove it from the alginate mold without breaking the alginate mold.
2) You could try cutting the alginate mold and with some experience that is also possible, but another problem is that epoxy does not work well in the moist alginate mold.
That is why you need to make a silicone mold for your casting, below are 3 ways to do that.
1 ) The nicest way to do that is like this Manual
- For this you need:
- Silicone A and B set
- A thickener so that the silicone is not liquid, but spreadable like butter.
- As a support cap, use the cheaper plaster cast.
2 ) An easier way is this Manual
- For this you only need the silicone and not the thickener, it does cost a bit more silicone.
3 ) Perhaps the easiest way with some practice is this Manual
- For this you need a different type of silicone , so that you can see a bit where you are cutting and not (too much) damage your current image. Please note, these silicones are very beautiful, but can be contaminated in liquid form by some substances, which makes them sticky and that would be a shame for your image. Substances that can cause problems are in varnishes, glues, latex gloves, etc. Therefore, first do a test on all products that you are going to use.
You can choose to use a beautiful clear epoxy that has a very long processing time and thus becomes beautifully bubble-free. You can also edit this well afterwards. And in liquid form also color it beautifully transparent .
7.12 How do I cast a butterfly or flower in Epoxy?
Of course, the pouring of the butterflies should be done right the first time. It would be a shame if something went wrong.
It might be wise to practice with a less important object (for example, a dried leaf from a tree).
To cast the butterfly you need: a mold, the butterfly and resin.
-A flexible mold made of silicone works very well, if you are going to make the mold yourself, use for example Silicone transparent 15 Normal
-The butterfly must be dried and moisture-free
-as resin you use epoxy with UV blocker. Preferably use an epoxy that hardens very slowly such as the Epoxy Gierhars Helder
Tip: Make sure the butterfly is fixed in the correct position in the mold so that it cannot float on the resin.
7.13 How do I cover a kitchen counter with epoxy?
For coating a kitchen countertop with epoxy, we recommend UltraCast XT Clear Epoxy Resin, heat resistant up to 95°C .
The step-by-step plan
1) The kitchen worktop does not need to be primed, but it does need to be extremely clean and thoroughly degreased with isopropanol .
2) With raised edges the epoxy will run out a bit and will therefore be thinner. If your top is white/light colored and you now want a dark color, it is recommended to paint or prime the top, especially at the raised edges (the front of the top).
3) The thickness when pouring will be about 0.5 mm (so half a millimeter) Then you need 0.5 liter per 1m². If you want to pour thicker (max 1 mm) you will of course need more.
4) Pay close attention to the instructions in the data sheets. It would be a shame if this goes wrong and the kitchen counter does not get the desired result.
- The resin needs to cure for up to 21 days to really get the final hardness and temperature resistance
- Do not use too much color paste or silicone or other effect solutions as these will reduce the temperature resistance of the epoxy.
- In particular, do not use a colour solution containing alcohol, as this will certainly reduce the temperature resistance.
- When coloring, it is best to use powders.
- Use an additional uncolored layer of UltraCast XT over the colored layer to increase temperature resistance.
- Keep the kitchen counter out of direct sunlight. If necessary, cover windows
- Preferably work at 20-25o At too high a temperature there is too little time to process the product properly. At too low temperatures the epoxy is exposed to temperature and humidity fluctuations for too long, which can cause amine blush or orange peel effects.
- Avoid air currents (also from air conditioners), keep temperature and humidity as constant as possible in the room where the epoxy is curing. Larger fluctuations give wrinkles, orange peel or fish eyes.
Above all, we always recommend doing a test on a similar surface to gain experience and see if this process works for you
7.14 How do I shape an old wooden frame?
For casting such a mold you can use silicone A with silicone B. However, there are 2 important points that you should take into account: 1- Adhesion, the silicone will possibly adhere if the frame is porous or unpainted. 2- Corrosion, the B component can corrode the old frame. To be sure, you can make a small amount of silicone and test it (in a place where this is not visible). If the silicone does not adhere here and has not affected anything, you can cast/spatter the mold. You can also look for a solution in silicone A Pink or Yellow or Green. Although these silicones are slightly more expensive, the chance of corrosion will also be significantly less. The chance of adhesion is hardly or not at all reduced. Finally, you can choose the natural product alginate (3D gel) from the web shop. However, this can only be used once and (because it is natural and water-based) has a limited shelf life (2 - 3 hours).
Remember that all silicones can leave a little bit of grease when curing. This means that there can be stains in your wooden frame that you cannot remove. Therefore, always make a small test first, on a part of the frame that is not important.
7.15 How do I make a Sex Toy/Dildo?
Let me briefly explain what you can do and what materials you can use:
Knead your own dildo from plasticine clay.
It is important that the model is slightly tapered so that it can easily be removed from the alginate later without breaking anything.
Insert a strip, pin, screw or similar object into the bottom of the molded dildo (this is what you will use to hold the dildo as you insert it into the alginate).
Now make an alginate mold from the sculpted work.
Mix the alginate 3D gel in the 1900 ml mixing cup . Also see the alginate data sheet for information .
use an alginate:water ratio of 1:3, so 100 grams of alginate with 300 grams of water.
Hold the plasticine dildo in the alginate mixture 3D gel (this takes about 3 minutes).
Let the alginate 3D gel harden and carefully remove the plasticine dildo from the alginate. Be careful or the alginate mold will break.
Gently move the model back and forth to allow air to enter.
Now prepare your silicone mixture for use and add silicone food coloring to it so that you have a nice color.
Add a small amount of food coloring (max 2%) to the A component. Silicone food coloring
Wear anapron to prevent clothes from getting dirty.
Wear gloves when handling the silicone (not because the silicone is dangerous but to keep your hands clean).
Mix the A- with the B- component of the Silicone Addition Transparent 15 Quick set with e.g. a mixing spatula
Pour the silicone into the alginate mold.
After half an hour (at room temperature) you can remove the dildo from the mold
If necessary, bake the dildo once for 2 to 3 hours in an oven at 100 °C to degas. Let the mold cool down!
Important: When the alginate mold is ready, it is important to prepare the silicone as soon as possible and pour it into the mold. The time between removing the plasticine and pouring the silicone should be a maximum of 15 minutes.
- Quantities per person :
- Plasticine : 500 grams
- Alginate : 400 grams
- Silicone : 550 grams
- Silicone dye 1 jar of the desired color is sufficient for everyone. (possibly multiple colors).
- Mixing cup 1900 ml 1 cup
- Mixing cup 1100 ml 1 cup
- Mixing spatula 1 (Depending on number of colours)
- Apron 1
- Latex gloves 1 pair