Build a washing press to start your own recycling business!
https://buckfastimker.wordpress.com/waspers-bouwen/
After the debacle with beeswax last year (2016), I also decided to build a wax press to set up my own cycle. A month ago I ordered silicone ( Silicone Condensation 20 ) and made a foundation mold.
For this you need a sheet of foundation and a casting mold to lock the sheet in. Make sure the casting mold is level to get the same thickness everywhere. After mixing the silicone sealant with the catalyst you have more than 100 minutes to pour the first layer on the foundation. Apply the first layer thinly so that all cells of the foundation are filled well.
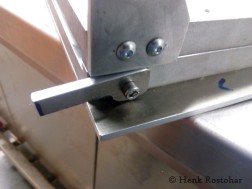
Then you can pour another layer of 2 to 3 mm silicone on top. Then the layer must harden for 16 to 20 hours. After hardening, turn the artificial comb sheet with the attached silicone over so that the artificial comb is on top again and repeat the procedure described above. After the second layer has hardened, you can take the package out of the mold and cut away the frays. Leave the layers of silicone and the sheet of artificial comb on top of each other. Below you can see what the package looks like. Now follows the creation of the press itself. I have chosen aluminum plates of 20 mm thick. The channels for the cooling water are milled in this. For this milling work I was allowed to use the CNC milling machine of a machine factory. The channels are closed by a 5 mm thick aluminum plate. In the photo below you can see how it will look. Tomorrow the chambers will be milled to be able to place the silicone package. There will also be a thickness adjustment and a handle. Today I did all the additional work like making a handle, a breakaway handle and the holes for the adjusting pins for the thickness adjustment. (Click on the pictures for a larger image)
Tomorrow the covers will be placed on the cooling channels. In this report of the construction of a wax press we place the silicone mold with the foundation in the milled chamber. First we degrease the chamber and the silicone mold with spirits or alcohol. Then a silicone primer is applied which we let dry for fifteen minutes. Then follows the application of the sanitary or kitchen sealant. After this the press is closed and we let the sealant harden until the next day. When opening the press the next day, the value of the thickness setting was immediately apparent. By turning the adjusting pins at the front, the press opened slowly and the cast-in foundation was released. This foundation was easy to remove by blowing it away with compressed air. The mold looked fine. Only a few millimeters of extra sealant had to be applied to one side. Then the cooling hose was applied. Next week I will make a support to support the lid in the open position and an adapter to connect the press to the garden hose. Then the test will follow. (Click on a photo for a larger image) Last Monday I did a test run with the wax press. The cooling with a speed-controlled pump was fine and needed no improvement. There was a problem with the wax that was pressed out of the press. It solidified in a place that affected the thickness. Last Monday I did a test run with the wax press. The cooling with a speed-controlled pump was fine and did not need any improvement. There was a problem with the wax that was pressed out of the press and it solidified in a place that affected the thickness. On Tuesday I adjusted the press by milling away a section. On Thursday I did another test run and the problem with the solidification of the wax was gone (milled away). The foundation appeared to be a bit too thin on one side, but thanks to the thickness adjustment that I had built into the press, this was quickly remedied. The result is a fast-working press that produces foundation of an even thickness and a weight of approx. 60 grams per sheet (simplex format). Project successful!